
Understanding Your Mini Electric Sewing Machine: Setup, Power, and Safety
Battery vs. USB Power Options and Device Initialization
Your mini electric sewing machine typically offers two power modes: battery operation or USB connection. Battery power provides portability for on-the-go repairs, while USB power ensures consistent energy for longer sessions. Before first use, always read the user manual to confirm the correct power source. Insert batteries following the polarity markings, or plug the USB cable into a stable 5V/1A adapter. Turn the power switch to “on” and listen for a soft hum—this confirms motor initialization. Never connect the machine to a high-voltage outlet unless the manufacturer explicitly supports it, as this can damage internal components.
Essential Safety Checks and First-Time Orientation for Beginners
Before sewing, perform a quick safety inspection. Place the machine on a flat, stable surface with at least 100 mm of clearance around it for ventilation. Verify that the power cable is intact and the plug fits snugly. Do a no-load test: press the foot controller without fabric to ensure the needle moves freely and no unusual noise occurs. Keep fingers away from the needle area during operation. Turn off the machine when threading or changing accessories. These simple habits prevent accidents and build confidence.
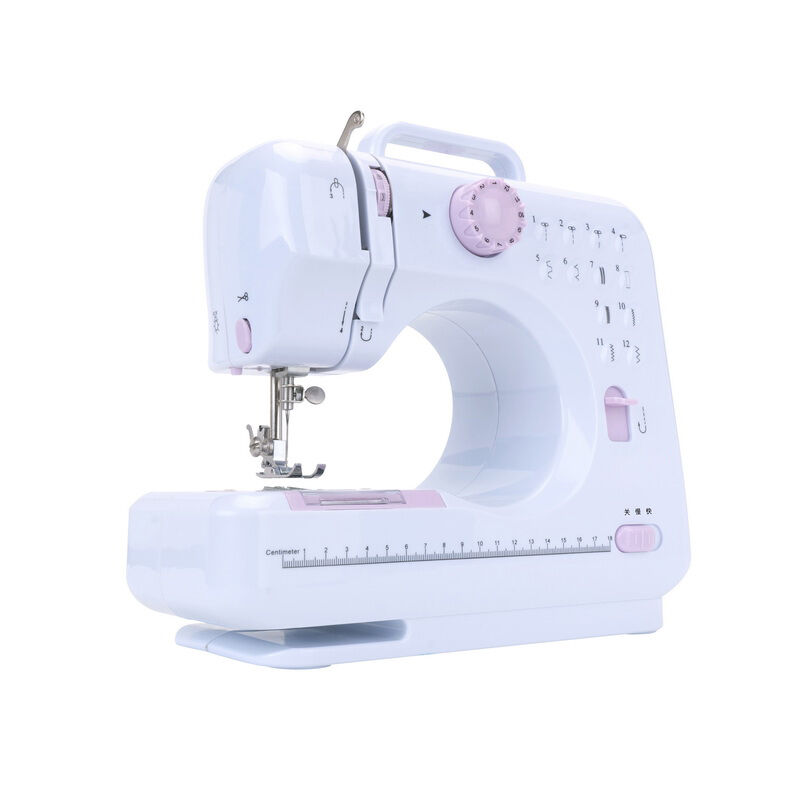
Threading the Mini Electric Sewing Machine Correctly
Upper Thread Path and Needle Threading — Step-by-Step Visual Logic
Proper threading ensures smooth operation. Begin by placing the thread spool on the designated pin and securing it with the appropriate cap. Guide the thread through the numbered guides sequentially—this path minimizes friction and maintains consistent tension. Pass the thread under the tension plate and through the take-up lever from right to left; this lever coordinates thread movement with the needle’s motion. For needle threading:
- Use the built-in threader for standard needles (sizes 75/11 to 100/16)
- Thread manually front-to-back for specialty needles or thicker threads
- Ensure the thread sits fully within the needle’s eye before closing the lever
Visual alignment is critical: confirm the thread follows the machine’s engraved path indicators. Incorrect routing causes 73% of thread breakage issues in compact models. Finish by pulling 4–6 inches of thread behind the needle, ready for bobbin engagement.
Loading and Managing the Bobbin for Reliable Stitching
Winding, Insertion, and Thread Engagement Best Practices
Proper bobbin management begins with even winding. Ensure the thread forms smooth, parallel layers without overlaps or gaps. Insert the bobbin into the case with the thread unwinding in the direction specified by your mini electric sewing machine (typically counterclockwise for most models). Guide the thread through the case’s tension spring slot, then pull gently to confirm consistent resistance—too loose, and stitches unravel; too tight, and thread snaps. Rotate the handwheel to lower and raise the needle, catching the bobbin thread with the upper thread. Pull both threads under the presser foot, leaving 3–4 inch tails.
Avoiding Common Bobbin Misalignment Errors
Uneven stitching or thread nests often stem from three errors:
- Improper seating: If the bobbin wobbles, reinsert it until it clicks securely into place.
- Debris interference: Lint trapped in the bobbin case disrupts tension. Clean weekly using a small brush.
- Tension imbalance: Test by stitching on scrap fabric. If bobbin thread surfaces on top, reduce upper tension slightly. Aim for the "one-third/two-thirds" rule: the bobbin thread should only show on one-third of the stitch underside.
Operating Your Mini Electric Sewing Machine: Controls, Speed, and Stitch Initiation
With your machine threaded and bobbin loaded, it's time to run the first seam. Start by placing a scrap fabric under the presser foot and lowering the foot securely. Most mini electric sewing machines use a foot pedal or slider switch to control speed. Press the pedal gently—or slide the speed control halfway—to keep the machine running slowly while you learn the rhythm. Beginner-friendly models typically operate at 300–600 stitches per minute. Always start at the lowest speed setting to maintain control and prevent skipped stitches. To initiate a stitch, position the needle just above the fabric, then press the start button or depress the pedal. Steady pressure produces even stitches; releasing power stops the needle. Familiarize yourself with the reverse lever to lock stitches at the beginning and end of a seam. Common stitches include the straight stitch for basic seams and the zigzag stitch for finishing raw edges or sewing stretchy fabric. Practice these two stitches on scrap material until you can start and stop smoothly without jerking the fabric—this builds muscle memory and confidence before tackling any project.
Troubleshooting and Building Confidence with Your Mini Electric Sewing Machine
Fixing Skipped Stitches and Thread Breakage
When your mini electric sewing machine skips stitches or breaks thread, start by rethreading both upper thread and bobbin completely—90% of such issues stem from incorrect threading. Ensure the needle is appropriate for your fabric weight; a size 80/12 universal needle works for most lightweight materials. If problems persist, check the thread tension dial settings—overly tight tension causes breakage, while loose tension leads to skipped stitches. Clean lint buildup around the bobbin case weekly using compressed air to prevent mechanical interference.
Beginner Practice Drills and Alignment Tips for Consistent Results
Build muscle memory with 10-minute daily drills on scrap fabric: first practice straight lines using the edge of the presser foot as a guide, then progress to gentle curves. Maintain consistent speed by partially depressing the foot pedal—mini machines respond instantly to pressure changes. For precise corners, stop with the needle down, lift the presser foot, pivot the fabric, then lower the foot to continue. These foundational techniques develop the hand-eye coordination needed for zippers, buttonholes, and other advanced applications.
FAQs
What power source is best for my mini electric sewing machine?
Mini electric sewing machines can typically use either battery power for portability or a USB connection for consistent, longer-term energy. Always consult the manual for specific requirements.
How do I avoid skipped stitches?
To avoid skipped stitches, ensure proper threading, use the correct needle size, and check the thread tension dial. Clean lint regularly to prevent mechanical issues.
What is the correct path for threading the machine?
The thread should be guided through the numbered guides on the machine, under the tension plate, and through the take-up lever before threading the needle.
Why does my bobbin thread create uneven stitches?
Uneven stitches may result from improper bobbin seating, lint in the bobbin case, or tension imbalances. Follow bobbin management practices and clean the case weekly.
What beginner drills can help me improve?
Start with straight-line and curve stitching on scrap fabric to build muscle memory. Use the presser foot edge as a guide to ensure consistent results before advancing to complex techniques.
Table of Contents
- Understanding Your Mini Electric Sewing Machine: Setup, Power, and Safety
- Threading the Mini Electric Sewing Machine Correctly
- Loading and Managing the Bobbin for Reliable Stitching
- Operating Your Mini Electric Sewing Machine: Controls, Speed, and Stitch Initiation
- Troubleshooting and Building Confidence with Your Mini Electric Sewing Machine
- FAQs